

Can You Install a Bed Rack on a Honda Ridgeline? Absolutely! Here's How.
If you've ever wondered whether you can mount an overland bed rack on a second-generation Honda Ridgeline, the answer is yes—and it's easier than you might think.
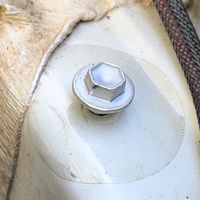
If you own a Honda Ridgeline, Honda Passport, or Honda Pilot, you may have run into the same frustration I have. Why is it so difficult to get to a convenient negative ground connection under the hood?
I'm going to show you a little trick I discovered that may make life easier when using jumper cables, testing electrical accessories, or connecting an inverter.
The Problem: Where Is the Negative Ground?
A simple DIY tip from CampingRandy
On these Honda vehicles, getting to a convenient negative ground connection can be more involved than it should be.
The usual process involves:
Removing the plastic cowl cover at the back of the engine compartment. Be careful with the retaining clips!
Removing the two Phillips-head plastic fasteners.
Removing the air filter assembly to gain better access.
Finally getting to a suitable negative grounding point.
And if you've done this before, you know how easy it is to drop one of those little plastic fasteners down into the engine compartment!
I've traditionally recommended using an existing grounding point, but I've found that sometimes the connection isn't as reliable as I'd like when drawing electrical current.
My DIY Solution: An Accessible Negative Grounding Point
While working on my Honda and installing an aftermarket skid plate, I noticed something interesting.
I had an extra bolt from the skid plate installation. It was a 40mm partially threaded M6 x 1.0 bolt, and I noticed there was an existing threaded opening in the fender area that looked like it could provide a convenient grounding location.
Here's what I did:
Located the existing threaded opening in the fender area.
Used the M6 x 1.0 bolt to check the threads and fit.
Prepared the contact area to ensure there was bare-metal contact rather than paint between the bolt and grounding surface.
Installed the bolt and tightened it using a 10mm wrench.
This gives me an accessible place to connect a negative ground lead without having to remove all the plastic trim and air filter components.
Important: This is a DIY grounding-point modification, not a factory-designated jump-start terminal. Confirm that the threaded location is suitable for your particular vehicle, that the bolt has proper thread engagement, and that the connection provides a verified electrical ground before using it. Do not assume every model year has the same configuration.
Testing the Ground Connection
In the video, I demonstrate the idea using my inverter setup.
I connect the negative lead to my new grounding point and demonstrate powering up the inverter.
The goal is to show how a conveniently located grounding point can make connecting accessories easier.
Always follow your inverter manufacturer's wiring and fuse requirements. For jump-starting, use the battery connections and designated grounding points specified in your Honda owner's manual. Do not disconnect a battery terminal while the vehicle or electrical system is energized.
Watch the Video
See the complete demonstration, including the removal, bolt installation, and inverter test.
https://youtu.be/_RzqhKJxTuk?si=o3OIrSn4NK45HX_FFrom
Buy the Jump Bolt Kit -
https://campingrandy.com/products/Honda-OEM-Negative-Ground-Jump-BOLT-and-Protector-p540074755
CampingRandy
I enjoy finding practical solutions to the little things that make owning and modifying our Hondas easier.
Sometimes it's not about buying an expensive accessory. It's about looking around, understanding how things are put together, and finding a smarter way to get the job done safely.
If you've found another way to establish an accessible negative ground on your Ridgeline, Passport, or Pilot, I'd love to hear about it.
Leave a comment and share your solution!
Happy wrenching!
CampingRandy

